David Gaspard
Tech through David's lenses.
How To Create A Data Input Grid In React

Creating a data input grid in your React application can be a challenging task, especially when you aim for both functionality and a seamless user experience. The Fresler-Table library offers a powerful yet straightforward solution to this problem, providing robust features to handle dynamic data input with ease. One example of where this type of input layout may be particularly useful is when users need to add many contacts to an app at once. Rather than provide a long form with different sections for each contact, we can use this more tabular approach to better organize the data and increase the density of information for the user.
In this tutorial, we’ll walk you through the process of setting up a data input grid using the Fresler-Table library. We’ll cover everything from installation to customization, ensuring you have a comprehensive understanding of how to leverage this library for your specific needs. You’ll learn how to create an input grid that not only allows users to input data efficiently but also integrates smoothly with your existing React components.
If you get lost, don’t worry! You can clone a more thorough example from the FreslerTable example repo.
Let’s get started!
1. Install The Table Library And Set Up Your App
If you don’t already have a React app that you want to work with, use this tutorial to create a basic “Hello World” app.
Once you have your app created, add @fresler/fresler-table to your package.json file using npm.
1
npm install @fresler/fresler-table --save
You must also remove <React.StrictMode> from your react app if present. This component prevents the drag and drop functionality of the table library from working correctly. The component reference may be located in your index.js or main.tsx file. Remove the reference from your index.js file (or wherever the reference may be) like so:
src/index.jsx
1
2
3
4
5
6
7
8
9
10
import React from "react";
import ReactDOM from "react-dom/client";
import App from "./App.tsx";
import "./index.css";

ReactDOM.createRoot(document.getElementById("root")!).render(
  // <React.StrictMode>
  <App />,
  // </React.StrictMode>,
);
2. Define The Columns Of The Data
First, choose where you would like to add your data input grid. In this simple example, we will add the data input grid to our App.jsx file. First we will define the columns or fields needed for each row/contact that the user will add. In this simple example, we will limit those fields to Name, Job Title, and Email like so:
1
2
3
4
5
6
7
8
9
10
11
12
13
14
15
16
17
18
19
20
const columns = [
  {
    displayName: 'Name',
    field: 'full_name',
    type: 'string',
    editable: true,
  },
  {
    displayName: 'Job Title',
    field: 'job_title',
    type: 'string',
    editable: true,
  },
  {
    displayName: 'Email',
    field: 'email',
    type: 'string',
    editable: true,
  },
];
3. Define Your Data
To store the data that the user adds, we will use a React state variable, called data. We will also add this to our App.jsx file.
1
const [data, setData] = useState([]);
4. Display Your Data Input Grid
Now we are ready to display the data grid. Simply import the fresler-table library and instantiate the table in your App.tsx like below to display it.
1
2
3
4
5
6
7
8
9
10
11
12
13
14
15
16
17
18
19
20
21
22
23
24
25
26
27
28
29
30
31
32
33
34
35
36
37
38
39
40
import { useState } from 'react';
import reactLogo from './assets/react.svg';
import viteLogo from '/vite.svg';
import './App.css';
import { FreslerTable } from '@fresler/fresler-table';
import '@fresler/fresler-table/css';

export const columns = [
  {
    displayName: 'Name',
    field: 'full_name',
    type: 'string',
    editable: true,
  },
  {
    displayName: 'Job Title',
    field: 'job_title',
    type: 'string',
    editable: true,
  },
  {
    displayName: 'Email',
    field: 'email',
    type: 'string',
    editable: true,
  },
];

function App() {
  const [count, setCount] = useState(0);
  const [data, setData] = useState([]);

  return (
    <div style=>
      <FreslerTable initData={data} initCols={columns} updateData={setData} />
    </div>
  );
}

export default App;

5. Add Data
Congratulations! 🎉
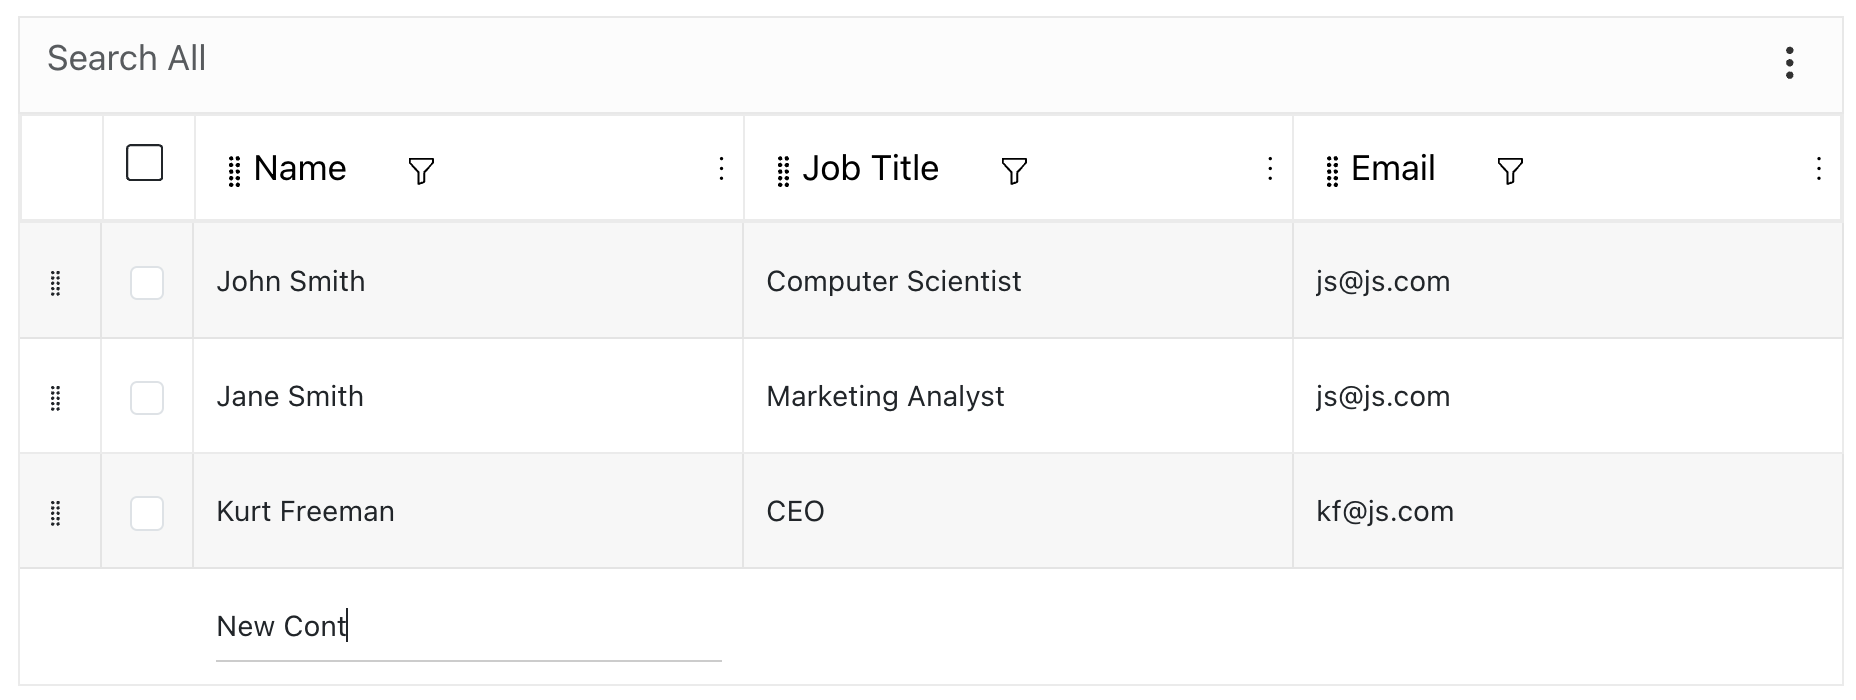
You’ve successfully created a sleek and intuitive data input grid using the Fresler-Table library. Now it’s time to test the interface by adding some data. Simply type in the Add New Row input field and press enter to add new data. You can easily navigate between cells using the tab key, making data entry quick and efficient. Your users will surely appreciate the streamlined and user-friendly interface.
If your example didn’t work as expected or if you want to explore a more complex implementation, check out this code sandbox. For any issues or questions about the library, feel free to create an issue on the .
