David Gaspard
Tech through David's lenses.
How To Create An Angular Web App And Containerize It - Angular Dotnet WebApp Lesson 2
Introduction
An intuitive and powerful UI is crucial to customer retention and progression. Angular is a TypeScript-based open-source web application framework. It’s usage centers around developing modules and inside of those modules, components. Modules are containers for a cohesive block of code dedicated to an application domain, a workflow, or a closely related set of capabilities and Components are the most basic UI building block consisting of an html element powered by a typescript class. More information about angular development can be found on their site. Here is good synopsis of the concepts that you need to get started.
In this tutorial, we will create an Angular web app to interface with the simple Web API that we created in the last lesson. Note: The web application created in this tutorial will be much simpler than the web application depicted in the first lesson because the full application was seeded from a licensed Angular template and cannot be redistributed. If you would like to take your web app to the next level, check out Theme Forest. They have plenty of great UI templates to bootstrap your application UI.
Prerequisites
- NodeJS and npm to run the web app
- Angular CLI to use Angular
Scaffolding the UI
Once you’ve installed these dependencies, you should be able to use the Angular CLI to create a new web app. In this example, I will create a new webapp in my Lesson 2 folder of my tutorial repository. You can access my output here.
1
2
3
cd angular-dotnet-webapp-tutorial
mkdir Lesson\ 2\ -\ Angular\ App/
cd Lesson\ 2\ -\ Angular\ App/
Now create the new web app using the angular CLI command ng new <app name> --directory <directory>
1
ng new webapp --directory .
This will create a new webapp called webapp in the current directory. Note: If you run into a package resolution issue ‘ERESOLVE unable to resolve dependency tree‘, you may need to force the new project creation and accept an incorrect (and potentially broken) dependency resolution.
1
2
3
# Only run this if 'ng new' fails with ERESOLVE error

npm install --legacy-peer-deps
After running the scaffolding command, you should see a message similar to the ones below

Success! You’ve been able to scaffold your new UI. Now, let’s see it in action
Running the Web App
Once you’ve created the new project, you are now ready to run the new web app. To start the webapp, run the command ng serve. You should see a success output similar to the one below.

Navigate to the URI specified. You should see a basic Angular landing page like this
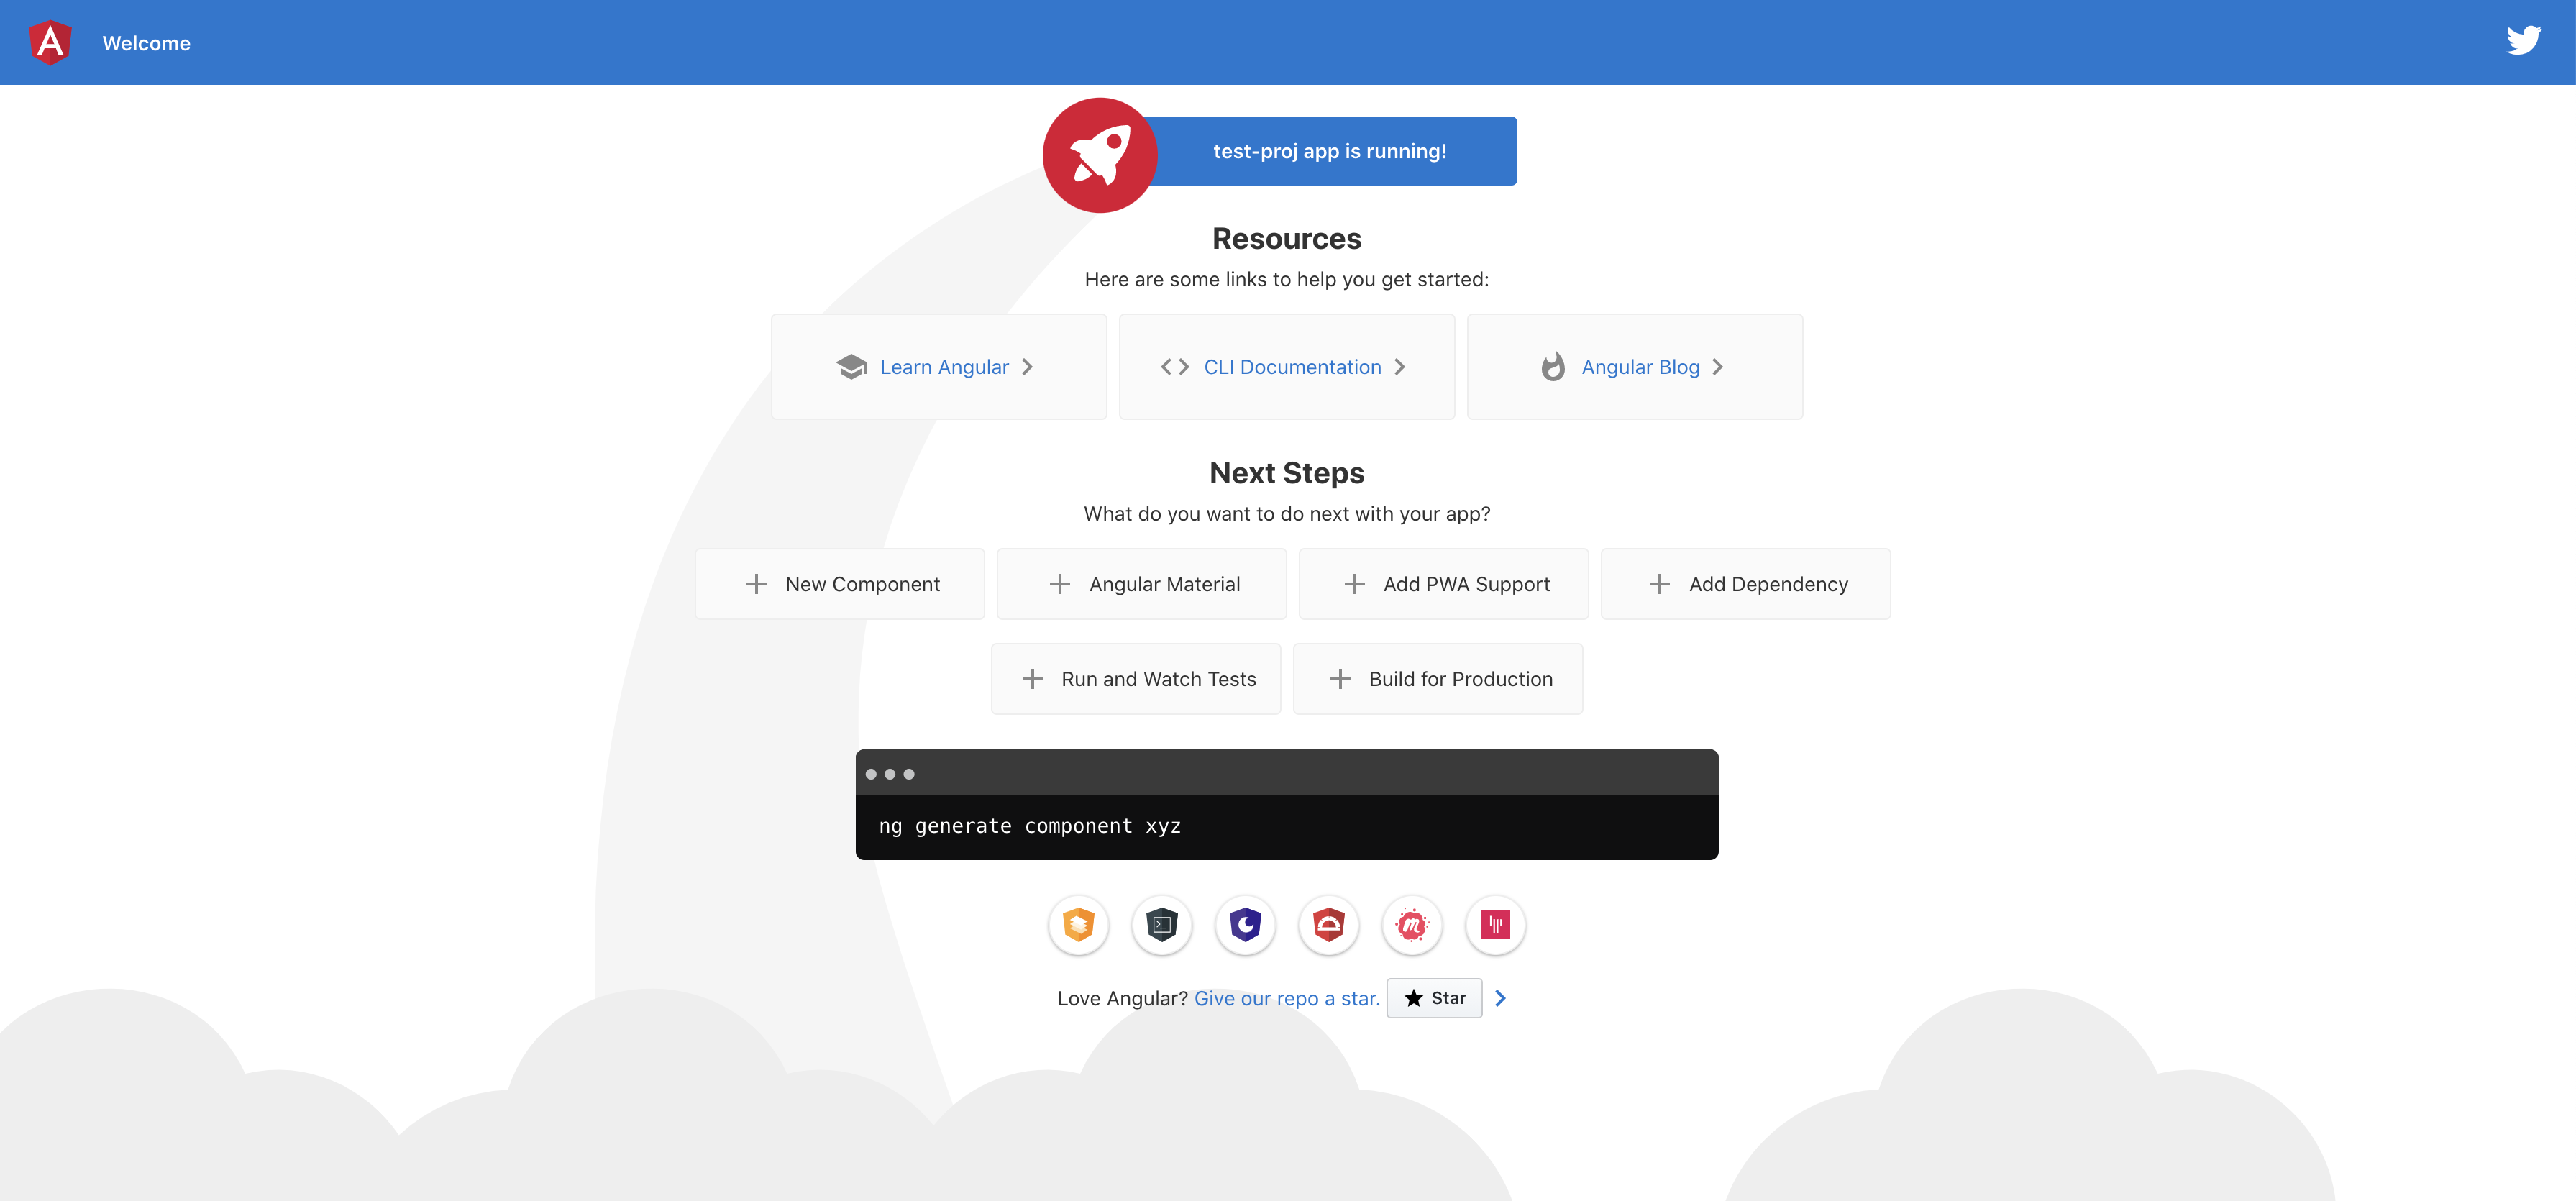
Great! Now you have a functional UI to get started with
Containerizing the Web App
Now that we have the webapp up and running we can go ahead and containerize it using Docker. In the root directory of the Angular app, create a new file called Dockerfile and copy the code below. In the build section, this docker file downloads the base image for running a node application and builds your angular app. In the prod section, it then adds the nginx web server layer and exposes port 80. You may notice when you ran your app outside of docker, your app was served on port 4200. However, since in this case, nginx is managing the ingress, it will serve your app on port 80 of the container.
1
2
3
4
5
6
7
8
9
10
11
12
13
14
15
16
17
18
19
20
21
22
23
24
25
26
27
28
29
30
31
32
33
34
35
36
37
38
39
#############
### build ###
#############

# base image
FROM node:12.2.0 as build

# set working directory
WORKDIR /app

# add `/app/node_modules/.bin` to $PATH
ENV PATH /app/node_modules/.bin:$PATH

# install and cache app dependencies
COPY package.json /app/package.json
RUN npm install
RUN npm install -g @angular/cli@7.3.9

# add app
COPY . /app

# generate build
RUN ng build --prod --output-path=dist

############
### prod ###
############

# base image
FROM nginx:1.16.0-alpine

# copy artifact build from the 'build environment'
COPY --from=build /app/dist /usr/share/nginx/html

# expose port 80
EXPOSE 80

# run nginx
CMD ["nginx", "-g", "daemon off;"]
Build the container with docker build -t webapp:v1 . . Notice that the image name is now webapp and not web API. You should see a slew of commands being run from docker. The final message should show:
1
2
Successfully built <hash>
Successfully tagged webapp:v1
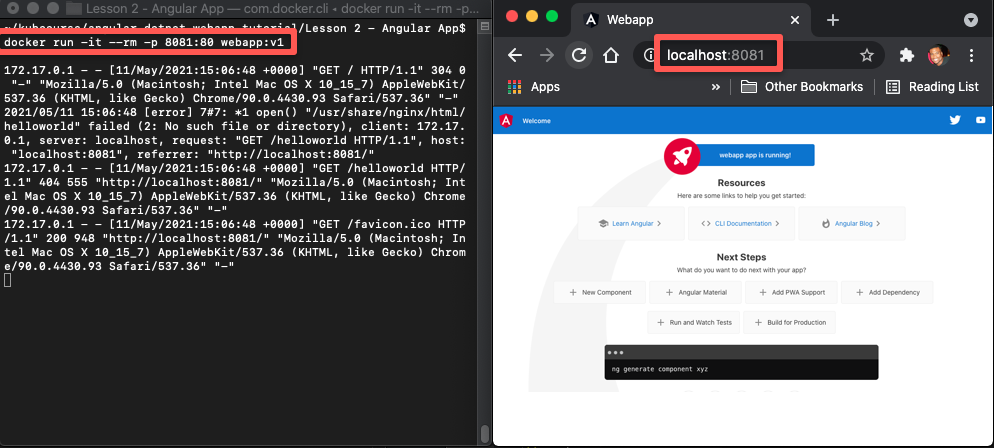
Once you’ve built the container image, you can run it in docker using the command docker run -it --rm -p <host port>:<container port> <image name>. In our case, we will use host port 8081. So the command will be docker run -it --rm -p 8081:80 webapp:v1.
Now you should be able to navigate to localhost:8081 in your browser.
Interacting with Your Web API
When creating a web application, you want to put as little business logic as possible directly in the UI so that your business logic and private data are secure from savvy scammers and hackers. You also want to reuse as much logic across platforms as possible so it helps to put your business logic into the Web APIs and leave your UI for simply rendering fetched data.
In our case, we want to make sure that we are pulling that data that we returned from the web API that we created in lesson 1 and rendering it in our new web app as depicted in the image below.
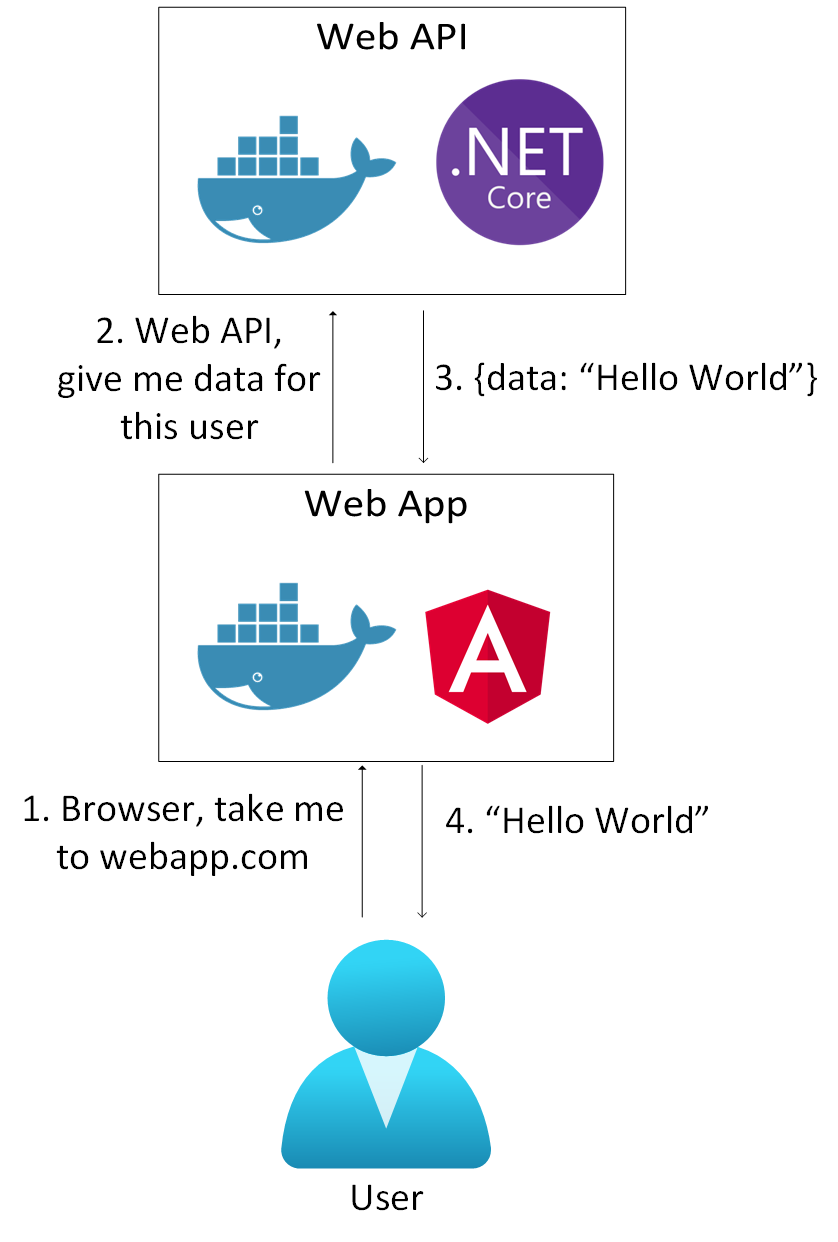
For our application, we will run the web API in the docker container at port 8080 like we did in lesson 1. In order to do this, we will need to make some changes to the Angular site to fetch the data.
Updating the Web API
In Angular, apps are comprised of modules. Those modules are comprised of components. Those components are classes, whose members fetch and manipulate data. Those component classes are bound to HTML templates, which are used to render components and visualizations of that data. Here, we will be updating the primary module to resolve new dependencies that we need. We need these dependencies so that we can update the app’s primary component to fetch the data that we need from our web API. And we wil update the primary HTML template to render the data fetched by the component.

Open the web application in VSCode using the terminal command code <path/to/webapp>. If you are already in the same folder in which you’ve created the webapp, this will reoslve to code . to open the current directory in VSCode. Once the web application is open in VSCode, you will need to update the primary module’s sole component HTML to display the message that we will retrieve from the web API. This component definition will be in a file named app-component.html. Remove all of the template code and leave only the <router-outlet></router-outlet> link. Replace the page content with a paragraph element <p></p> and update the paragraph’s content to Message: {{ this.message }}. This will display the static string “Message:” and this.message will resolve to the message that we will resolve from the web API.
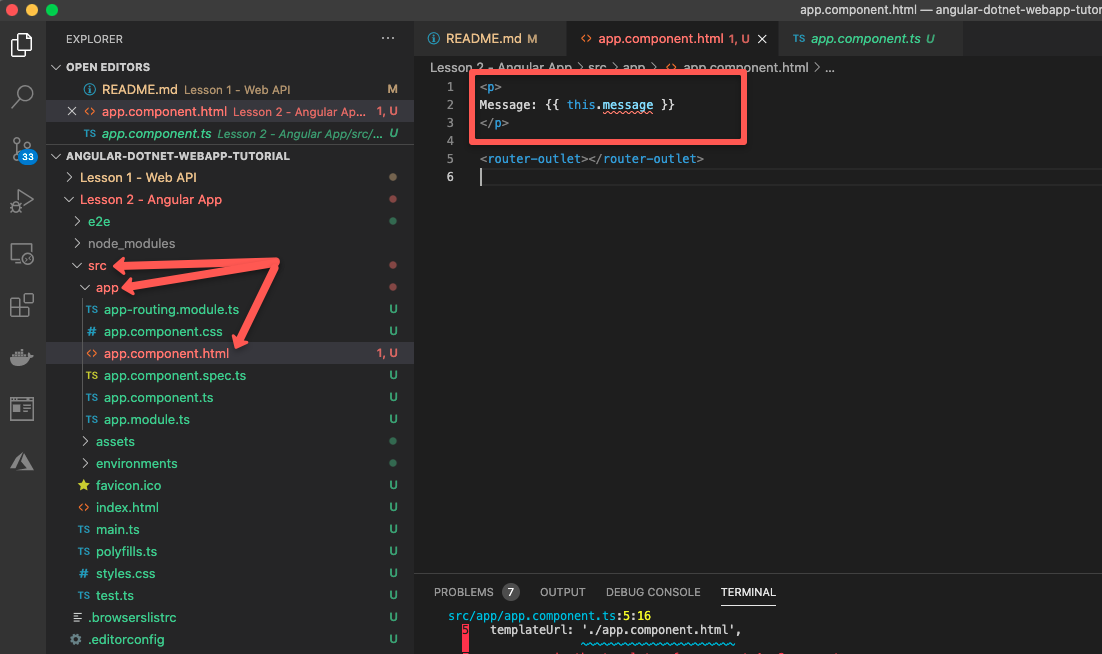
If your app is still running, you should see an error stating that Property 'message' does not exist on type 'AppComponent'
Getting Data From the Web API
The HTML inside of app-component.html that we just edited is bound to the Angular component defined in app.component.ts. This component provides all of the business logic and variable values for the HTML. Add a new property to the class named ‘message’ and update the value of message to “Loading”. If the web app is not currently running, run the updated web app using ng serve.

Now that we have a default value, we can force the app component to retrieve the data from our web API upon loading. When the data is retrieved, it will automatically update the message value in the page to the message retrieved from the web API.
1) Update the app module defined in src/app/app.module.ts to import the HttpClient module
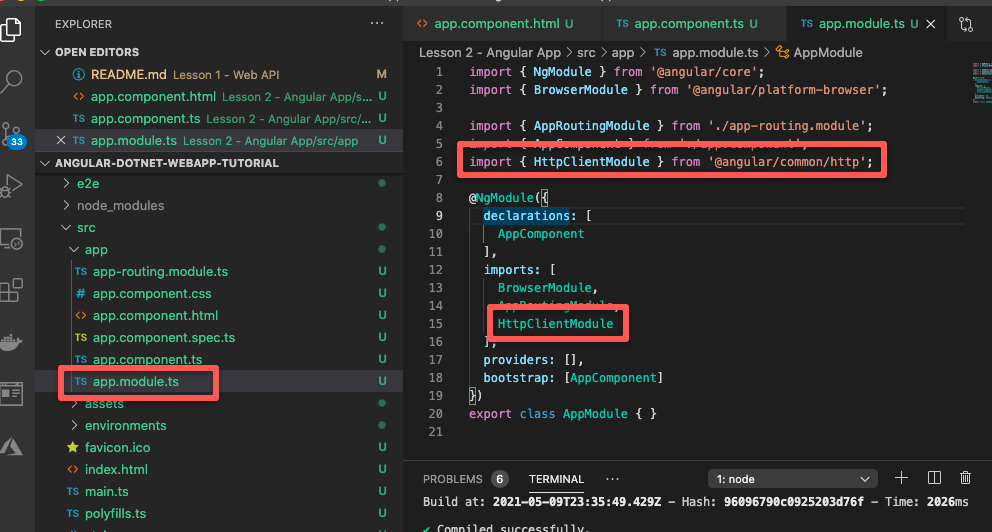
2) Update the app component (app-component.html) to load the HttpClient with import { HttpClient } from '@angular/common/http';.
3) Add the code to create a constructor method for the app component constructor(){}. Constructors are methods that are called to initialize a class when a new instance of the class is instantiated.
4) Inside of this constructor signature, inject an HttpClient member with constructor argument private http: HttpClient
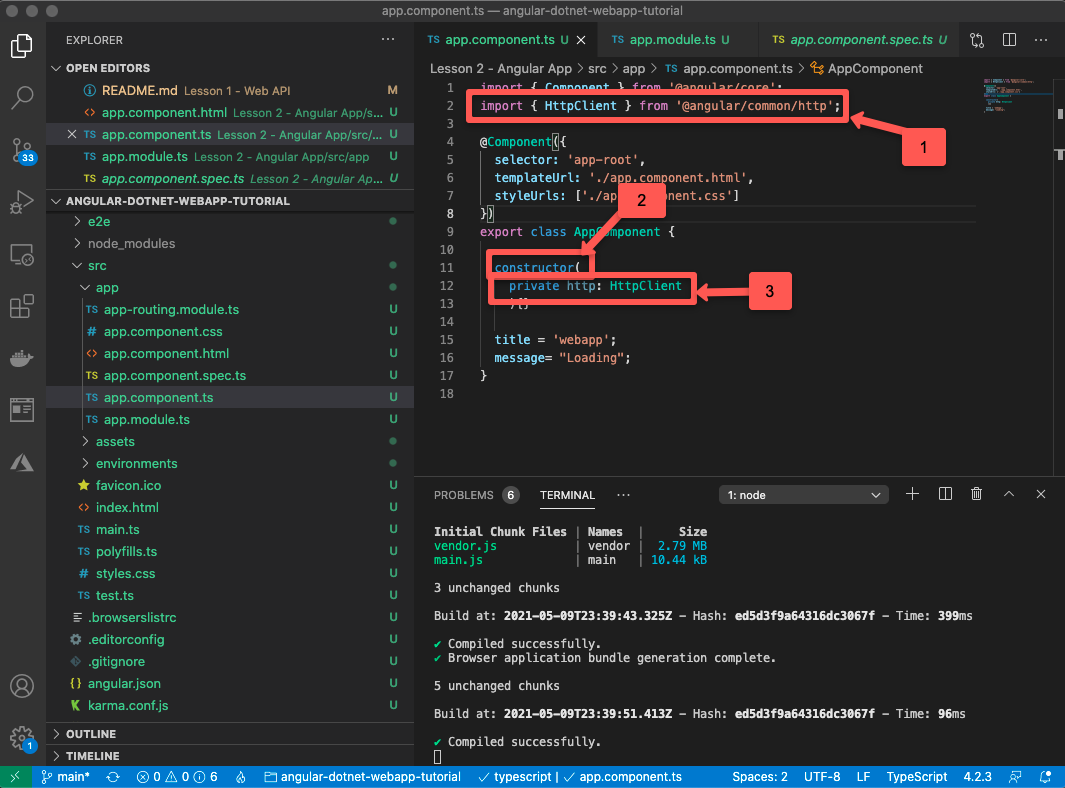
Your component should look like this:
1
2
3
4
5
6
7
8
9
10
11
12
13
14
15
16
17
18
19
import { Component } from '@angular/core';
import { HttpClient } from '@angular/common/http';

@Component({
  selector: 'app-root',
  templateUrl: './app.component.html',
  styleUrls: ['./app.component.css']
})
export class AppComponent {

  constructor(
    private http: HttpClient
    ){

    }

  title = 'webapp';
  message: any= "Loading";
}
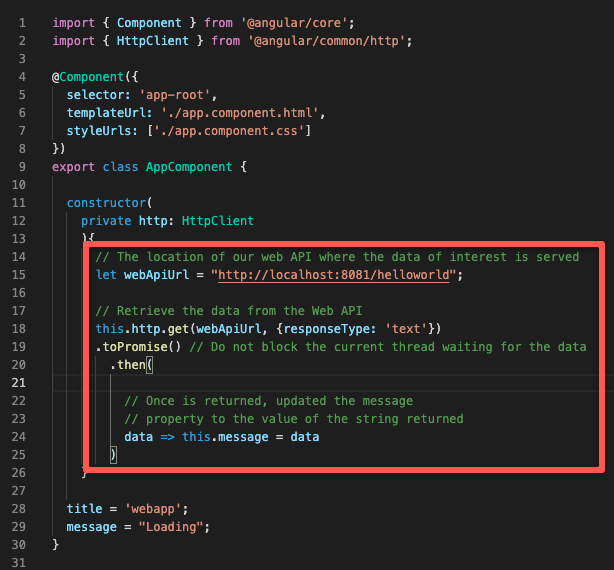
Now, we will load the data from our web API in the constructor of the component class. Of course, this is not best practice for object-oriented or parallel programming to fetch data directly in the constructor, but is the simplest implementation for the sake of this tutorial.
5) Add the code below to your constructor body
1
2
3
4
5
6
7
8
9
10
11
12
      // The location of our web API where the data of interest is served
      let webApiUrl = "http://localhost:8080/helloworld";

      // Retrieve the data from the Web API
      this.http.get(webApiUrl, {responseType: 'text'})
      .toPromise() // Do not block the current thread waiting for the data
        .then(

          // Once is returned, updated the message
          // property to the value of the string returned
          data => this.message = data
        )
Cross Origin Resource Sharing
You are now ready build build and run your updated API. In a terminal, build and run your web API if it is not already running.
1
2
3
4
# For me this directory is 'angular-dotnet-webapp-tutorial/Lesson 1 - Web API'
cd </directory/to/webapi>
docker build -t webapi:v1 .
docker run -it --rm -p 8080:5000 webapi:v1 .
In a separate terminal, build and run your web app if it is not already running.
1
2
3
4
# For me this directory is 'angular-dotnet-webapp-tutorial/Lesson 2 - Angular App'
cd </directory/to/webapp>
docker build -t webapp:v1 .
docker run -it --rm -p 8081:80 webapp:v1
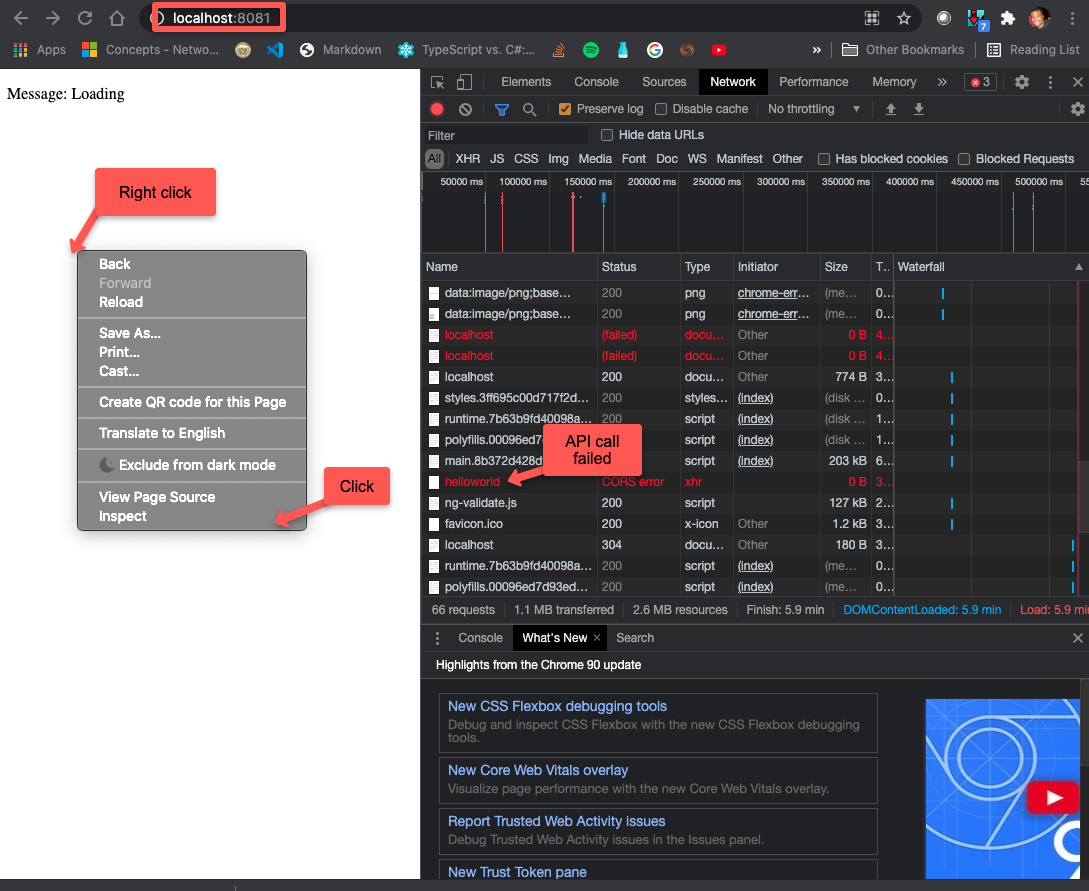
You should see your app running at http://localhost:8081/ in your browser. However, you may notice that your app always stays in the loading state. Let’s check the network activity in Chrome by using the Chrome debugger. To access the Debugger, right click anywhere on the screen and select Inspect. Then go to the Network tab in the debugger. You may notice an error when calling your web API with a status of CORS error.
Stop both your web app and the web API servers in the separate terminals with ctrl+C
Your Web API does not seem to be allowing API calls from domains outside of it’s own. The domain of your web app is localhost:8081 and the domain of your web API is localhost:8080. We need to update the web API configuration to allow incoming requests from all possible domains of the web app. Stop both your web app and the web API servers in the separate terminals with ctrl+C. Navigate to the root of your web API and open the Lesson 1 - Web API/Startup.cs file in VSCode.
- Add a new property to the Startup class with
readonly string MyAllowSpecificOrigins = "_myAllowSpecificOrigins"; - In the ConfigureServices method, add a new function call to services.AddCors with the code below. This will allow API calls from the domains listed below
1
2
3
4
5
6
7
8
9
10
11
12
         services.AddCors(options =>
         {
             options.AddPolicy(name: MyAllowSpecificOrigins,
                 builder =>
                 {
                     builder.WithOrigins("http://localhost:4200", // Angular app
                                         "http://127.0.0.1:4200",
                                         "http://localhost:8081", // Angular app in container
                                         "http://127.0.0.1:8081",
                                         "http://localhost");
                 });
         });
- In the Configure method, add a function call to app.UseCors with
app.UseCors(MyAllowSpecificOrigins);
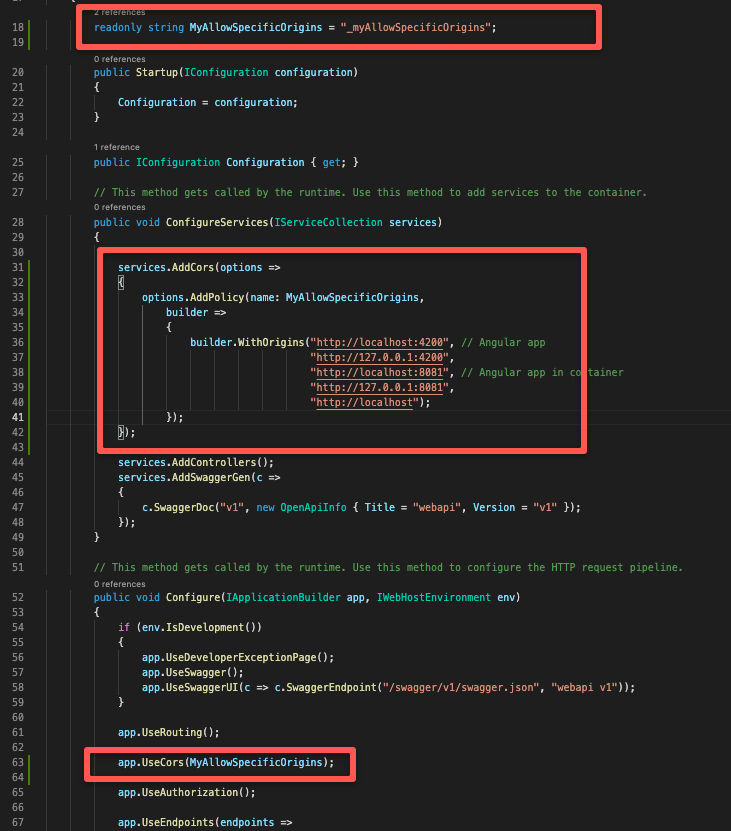
Your final Startup.cs class should look like the one above. Now rebuild the API and serve. In a terminal, build and run your web API.
1
2
3
4
# For me this directory is 'angular-dotnet-webapp-tutorial/Lesson 1 - Web API'
cd </directory/to/webapi>
docker build -t webapi:v1 .
docker run -it --rm -p 8080:5000 webapi:v1
In a separate terminal, build and run your web app if it is not already running.
1
2
3
4
# For me this directory is 'angular-dotnet-webapp-tutorial/Lesson 2 - Angular App'
cd </directory/to/webapp>
docker build -t webapp:v1 .
docker run -it --rm -p 8081:80 webapp:v1

Conclusion
You should see the Web app working like above. Phew! You were able to successfully create a web API and fetch data from the backend to display to the user.
If you were not able to get your web API and web APP working, take a look at the solution for some tips and tricks. Don’t just run the code. Try to understand what went right and what went wrong.